This is the kid's Halloween costume - quite a production, let me tell you...
And here's the rig:
What you can't see is the metal construct (coat hangers, reshaped) that supports the glow sticks. The faux tungsten filament was sewn on in numerous spots, very messily. And those jeans are actually a shade of gold!
You have to trust me, it was quite something on the trick or treat circuit.
Monday, October 31, 2011
Saturday, October 29, 2011
Foggy
In case you've been losing sleep over my previous post (Lord knows, I have), the sweater has definitely shrunk back in the direction of its original proportions. The question remains: Is it bigger than it was before I blocked it (cuz the size was perfect, esp. given the short row horizontal bust darts I finagled)? In truth, I'm afraid of the answer so I'm telling myself it's still not dry. I suspect my nerve will return when it's irrefutable that the sweater is no longer damp i.e. tomorrow or 70 hours after it first got wet.
I am definitely less traumatized than I was yesterday. After all, it's just a sweater, in the end. It took me 8 days to knit it and I learned a lot. Worst case scenario: Another Xmas present off the list.
The clasp still has not arrived so I can't really assemble it for a photo. I will, likely tomorrow, give you a blow-by-blow of what I did well, and what I could have done better. I know, you can't handle the excitement :-)
Yesterday evening I started knitting some fingerless gloves to go with my keyhole scarves. The pattern is Vancouver Fog by Jen Balfour:
That's a little preview of the lovely cable. The pattern is written for double-pointed needles, but I don't have them (nor have I used them), so I am using magic loop. It makes it a little bit less intuitive - and, seriously, this cabling is quite a bit harder than that which I worked flat in my keyhole scarves. I've never made a glove / gusset / thumb finger (really small diameter knitting) so it's all a bit experimental. I'm hoping it's going to work well though.
I've chosen a couple of other fingerless glove patterns that take a skein of yarn - so that I can use up some of the extra balls I couldn't return for one reason or another.
Anyone knit this pattern? What do you think?
Thursday, October 27, 2011
Shout Out to the (Knitting) Experts: Blocking Insanity Eeeek. Need Reassurance.
OMG - after having just finished a fairly excellent sweater with Debbie Bliss Rialto DK (a fairly excellent merino/microfiber blend wool), I wet blocked it and it grew 680 times?!?!?!?!? Honestly, my extra small sweater is a freaking tunic. The small, delineated stitches have gone big and ugly.
I've lain the sweater flat and tried to mini it up to its previous size (as if).
Please tell me this thing is going to dry back to its original proportions. I didn't treat it roughly. It's not like the yarn came with instructions contraindicating washing.
I'm kind of freaking out.
I've lain the sweater flat and tried to mini it up to its previous size (as if).
Please tell me this thing is going to dry back to its original proportions. I didn't treat it roughly. It's not like the yarn came with instructions contraindicating washing.
I'm kind of freaking out.
Sunday, October 23, 2011
Wiggle Skirt (With Photos)
I have so many thoughts about my just-completed skirt (skip to the photos below if the text is of no interest...). This is the third time I've made it, but it's the first time I actually finished the waist properly. When I started sewing, I had a really tough time with facings. I didn't really know what they were, so I interpreted them to be waistbands. With really bad instructions. Ah, inexperience...
At any rate, now I understand facings - though I don't tend to like them. In this skirt they work well.
I used the rest of my Lady Gray coat navy boucle, with a certain amount of natural crosswise stretch. Seriously peeps, how many modern ladies do you know who have a peplum coat with a matching skirt! Got me thinking about the origin of sets. They're an efficient and prudent use of fabric. I'm sure the home sewists of the 50s understood that.
Furthermore, I realized - as I was working with a truly lovely fabric - that the key to constructing garments that seem expensive is to use either very thin-weight fabric, or very thick-weight fabric. The heft of this skirt is SO retro. And it is very attractive around the hips and ass.
While making this, after having muslined it a year ago, and fitting it painstakingly each step of the way when making this version (the third), I realized something about home sewing that doesn't really thrill me. See, in the final analysis, despite everything, the waist is too big in this fabric. Partly, that's because of how the stretch worked unknowably with the facings. Partly the crosswise stretch really took on a life of its own. My hips are slightly slimmer than my dressform's, and my butt has actual flexibility in its shape, so I can actually lower the high waist to sit more at the low waist and it's alright. On the form, it just looks weird (and I even pinned the back in the top shot to make it seem more fitted).
My great realization? Well, if I'd found this rather nicely constructed, practical but elegant skirt in a store, I'd have tried on one size down. Maybe it would have fit, maybe not, but I'd have had that alternative. Here, I've spent hours to craft something that is really well-made (if I do say so myself), despite its flaws which I won't go into, and it doesn't fit perfectly. My only recourse - which, in real life I don't have because this fabric is long gone - would be to make the exact same skirt again, knowing what I know of the fabric ease now. That's neither practical, cost-effective nor enjoyable, as it happens. (Note: I do realize I could undo the waist facing, get rid of the lining and basically reconstruct this actual skirt, but that is NOT my thing. I can't get up any interest in doing that.)
Some Extra-Instructional Techniques:
So, what do you think?
At any rate, now I understand facings - though I don't tend to like them. In this skirt they work well.
I used the rest of my Lady Gray coat navy boucle, with a certain amount of natural crosswise stretch. Seriously peeps, how many modern ladies do you know who have a peplum coat with a matching skirt! Got me thinking about the origin of sets. They're an efficient and prudent use of fabric. I'm sure the home sewists of the 50s understood that.
Furthermore, I realized - as I was working with a truly lovely fabric - that the key to constructing garments that seem expensive is to use either very thin-weight fabric, or very thick-weight fabric. The heft of this skirt is SO retro. And it is very attractive around the hips and ass.
While making this, after having muslined it a year ago, and fitting it painstakingly each step of the way when making this version (the third), I realized something about home sewing that doesn't really thrill me. See, in the final analysis, despite everything, the waist is too big in this fabric. Partly, that's because of how the stretch worked unknowably with the facings. Partly the crosswise stretch really took on a life of its own. My hips are slightly slimmer than my dressform's, and my butt has actual flexibility in its shape, so I can actually lower the high waist to sit more at the low waist and it's alright. On the form, it just looks weird (and I even pinned the back in the top shot to make it seem more fitted).
My great realization? Well, if I'd found this rather nicely constructed, practical but elegant skirt in a store, I'd have tried on one size down. Maybe it would have fit, maybe not, but I'd have had that alternative. Here, I've spent hours to craft something that is really well-made (if I do say so myself), despite its flaws which I won't go into, and it doesn't fit perfectly. My only recourse - which, in real life I don't have because this fabric is long gone - would be to make the exact same skirt again, knowing what I know of the fabric ease now. That's neither practical, cost-effective nor enjoyable, as it happens. (Note: I do realize I could undo the waist facing, get rid of the lining and basically reconstruct this actual skirt, but that is NOT my thing. I can't get up any interest in doing that.)
Some Extra-Instructional Techniques:
- One thing I did, and would recommend this for all skirts of heavy weight, is to open the darts and press the to each side, to diminish waist bulk. Fortunately this fabric doesn't fray, so that was fairly easy. And the lining covers the evidence.
- I also shortened the lining above the back vent, and left it untacked (free), It acts like a slip.
- I haven't actually hemmed this yet, but I will wear it as-is because I serged the bottom and it is totally invisible (or, when pointed out, looks like an interesting design element). I like the length - 1.5 inches below the knee - and I want to work with it for starters. If I decide to hem, it will be as easy as removing a couple of tacks from the bottom of each side of the vent (sewed in to keep the vent from flopping). Note that this length is not universally flattering but, if one is hour-glass shaped, it can elongate the frame. It tends to work with slender calves best. And boots or heels.
- I used my serger extensively on this project. Y'all know I love that machine and do not begrudge for one minute having spent an exorbitant amount of money on it. It created a very neat finish.
- The bemberg was in rough shape by the end of it. I stained it, I had to unpick the centre back seam and there are little holes left behind. There's a long line of damaged weave in the centre of the back. Admittedly, it was there in the beginning and I knew about it. If anyone can recommend a lining that's easier to work with, and nicer, I'd love to know. I don't really enjoy bemberg, despite hearing of all of its virtues.
- In retrospect, I don't much like lining. I'd probably make this without lining the next time, and wear a slip.
This photo is badly over-exposed but it does show the boucle and the line of the skirt and the unhemmed bottom. I said I wouldn't point out flaws but the zipper is not fab. The fabric really bunched on one side, despite all of my efforts to avoid that. It's in the nature of thick fabric.
The lining is gathered at the top, not darted. And is actually done evenly on both sides though this photo doesn't show that...
I'm quite happy with the way the lining was stitched to the zip. I hate the look of this kind of hand stitching but it's not likely to rip off - as have some of my other experiments.
So, what do you think?
Thursday, October 20, 2011
Clasping at Straws
The modern era has its challenges, for example: where's a nice sweater clasp when you need one?
I wandered the city like an idiot, visiting craft establishments galore in the veritable craft centre of Canada, and I could barely find anyone who even understood what a sweater clasp is.
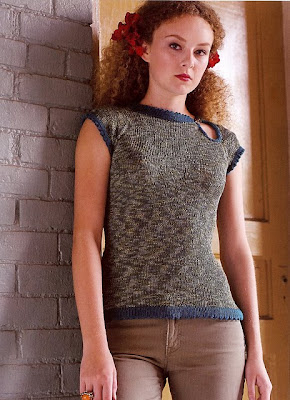
So, in case you were born after 1970, a sweater clasp is the thing used to hold together the keyhole in this retro-inspired sweater I just happen to be knitting:
Sidenote: Would it have killed Ms. Japel to name this sweater something snappier (no pun intended) than the Split Neckline Cap Sleeve Tee. It doesn't exactly roll off the tongue! Now I'm going to have to call it the SNCST (if I can even remember that).
Eventually I took to the interwebs. While I'm not really into Ebay - it freaks me out and it's ugly - I do love Etsy (the cuter, crunchier granola sister).
Even there, the pickings, for the type of clasp I was searching for, were limited. I mean, it's like no one is wearing these things. I did find a vintage boutique selling quite a lot of them (and lovely ones), but they were of this variety:
This type, while totally adorbs, does not hold the sweater pieces in question closely closed.
In fact, I searched for almost an hour before finding this one:
(The pearls are textured on purpose and the vendor has happily agreed to take them back if I'm unhappy with the condition upon receipt. The piece is very well preserved, apparently.)
I think it'll look swell on a camel coloured, short-sleeved, retro-inspired sweater with black trim.
Thoughts on this fashion statement? Does any of you actually own one of these?
I wandered the city like an idiot, visiting craft establishments galore in the veritable craft centre of Canada, and I could barely find anyone who even understood what a sweater clasp is.
So, in case you were born after 1970, a sweater clasp is the thing used to hold together the keyhole in this retro-inspired sweater I just happen to be knitting:
Sidenote: Would it have killed Ms. Japel to name this sweater something snappier (no pun intended) than the Split Neckline Cap Sleeve Tee. It doesn't exactly roll off the tongue! Now I'm going to have to call it the SNCST (if I can even remember that).
Eventually I took to the interwebs. While I'm not really into Ebay - it freaks me out and it's ugly - I do love Etsy (the cuter, crunchier granola sister).
Even there, the pickings, for the type of clasp I was searching for, were limited. I mean, it's like no one is wearing these things. I did find a vintage boutique selling quite a lot of them (and lovely ones), but they were of this variety:
Photo courtesy of Pink Rhino Vintage
This type, while totally adorbs, does not hold the sweater pieces in question closely closed.
In fact, I searched for almost an hour before finding this one:
(The pearls are textured on purpose and the vendor has happily agreed to take them back if I'm unhappy with the condition upon receipt. The piece is very well preserved, apparently.)
I think it'll look swell on a camel coloured, short-sleeved, retro-inspired sweater with black trim.
Thoughts on this fashion statement? Does any of you actually own one of these?
Wednesday, October 19, 2011
Shout Out to the Experts: Inserting a Bagged Lining
Sewing Divas: Can you advise - as I can't seem to find anything anywhere (in my 5 minutes of looking): Is inserting a bagged lining as simple as stitching the right side edges of the lining and the skirt at the hem cut line of each, then flipping up the lining and attaching it all at the waist?
The skirt I will make (V8640) does not have lining instructions. Last time, I made a "regular" lining by cutting the fabric pieces again in lining fabric (minus the waistband) and assembling that, wrong sides together, at the waist. I serged the lining hem at the bottom.
This time, I thought I'd branch out, but I don't want to court disaster i.e. no original pattern modified x2 = potential eeek.
To complicate matters, this skirt has a vent at the centre back. I did find Kay's awesome post on working around the vent, but I'm still nervous about the general process.
Any feedback would be so welcome and appreciated. Kxo
Labels:
Bagged Lining,
Pencil Skirt,
Sewing,
Shout Out,
V8640
Tuesday, October 18, 2011
Wherein I Tell You I Spend Too Much Money On Crafting...
I think we can say - as, for the second time this month, I've spent $179.00 on yarn - I have a habit. Verging on a problem. The only thing that redeems me is that I am actually using up all the yarn I am purchasing, before purchasing more. That is to say, I have practically no stash and I'm still spending hundreds of dollars.
Those of you who think that sewing is expensive, meet knitting.
Today I bought:
To wit, I spent three hours scoping out how to fit this on me, modifying the top-down pattern to reflect my sizing needs:
At this point, I bundle all of my projects with their respective patterns, modifications and needles into self-serve ziploc bags. That way everything stays where it should.
Then there's my sewing. In keeping with my add a new skirt and use a TNT plan, I'm going to remake the high-waisted pencil, Vogue 8640, in the boucle I used to make my Lady Grey coat. With this yellow lining. Interesting, huh? I am hoping to get to that this weekend, though there are a few alternate plans coalescing.
I wish that I had the moxy to cut and sew on weekday evenings but I just don't - and I can't do it with my family around me (a priority) which knitting affords quite easily. Pls don't confuse my recent knitting emphasis with a decline in my love for sewing. I just haven't shown those wares in as much detail lately...
Those of you who think that sewing is expensive, meet knitting.
Today I bought:
- Debbie Bliss Cashmerino Aran in black. I was serious when I said I'd be making that shrug again. And I got an extra skein so I can lengthen the sleeves. You know how I like elbow-length.
- A whack of Debbie Bliss Cashmerino DK (a lighter weight than the Aran) in camel (what a terrible name for a colour) and some black Liberty worsted neck/sleeve/hem contrast colour cuz I'm going to make this:
To wit, I spent three hours scoping out how to fit this on me, modifying the top-down pattern to reflect my sizing needs:
- XS neck / arms which grade to...
- ...S body (plus a few stitches) to accommodate a 37" bust. I'm just going to increase them onto my circular needles when I start knitting the torso in the round. Knitters: Does that seem like it will work?
- Removal of vertical length i.e. rows between bust and waist
- Decrease in 32 stitches between bust and waist circumference
- Removal of vertical length i.e. rows between waist and high hip
- Increase of 38 stitches between waist and hip circumference
At this point, I bundle all of my projects with their respective patterns, modifications and needles into self-serve ziploc bags. That way everything stays where it should.
Then there's my sewing. In keeping with my add a new skirt and use a TNT plan, I'm going to remake the high-waisted pencil, Vogue 8640, in the boucle I used to make my Lady Grey coat. With this yellow lining. Interesting, huh? I am hoping to get to that this weekend, though there are a few alternate plans coalescing.
I wish that I had the moxy to cut and sew on weekday evenings but I just don't - and I can't do it with my family around me (a priority) which knitting affords quite easily. Pls don't confuse my recent knitting emphasis with a decline in my love for sewing. I just haven't shown those wares in as much detail lately...
Sunday, October 16, 2011
Shrug it Off
No question about it, this shrug is odd. Not that I don't like it. And it is strangely warm.
It's like the tea cozy of sweaters...
At any rate, I totally recommend the pattern (or the Craftsy.com workshop from which I knit it). Craftsy workshops are a new feature in this web community known for teaching all kinds of crafts through interactive online classes. They're kind of like a cross between a blog sew along and a Craftsy-style tutorial. These workshops will cost (I'm using a prototype I was invited to try out), though not as much as the online classes. I believe the fee to join this one is $15.00 - and you can continue to refer to it forever. This fee includes the pattern and some really excellent instruction / photos, plus access to a well-organized "discussion area" wherein all users can swap info, ask questions, and receive feedback from the instructor.
The One Skein Knit Shrug is a riff on another Stefanie Japel pattern: The One Skein Wonder which, interestingly enough, I purchased a while ago, but hadn't made until now.
The Good:
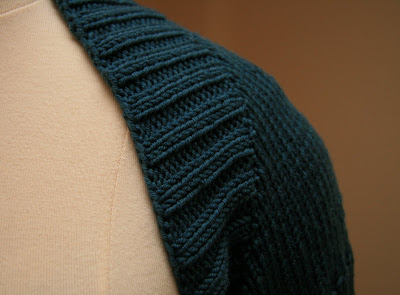
- Never mind the excellent workshop forum, the pattern is excellent and clearly explained. I love the raglan sleeve, constructed out of KFB. What a simple, but elegant, stitch increase.
- This project is efficient: it's easy, quick and it makes use of small amounts of yarn you might have left over from other projects. To wit: I used the 3 remaining skeins of yarn from this project.
- I can't say how much I love the Debbie Bliss Rialto Aran. It's got great hand. Warning: it is inclined to split around the needle.
- I think this would be particularly useful and flattering in black (how often do I say that??).
- It would make an affordable and adorable Xmas gift.
- While I made the 18" cross back size (the third largest of 8 sizes), it took about 20 yards more yarn than the pattern called for. I've read others say things to the same effect. Point is, making a sweater out of one skein of yarn is pretty dicey. My version took almost 3 skeins - each having 80m of yarn - vs. the one skein of 220 yards that the pattern recommends. Total amount converts to about 240 yards.
- I didn't make a gauge swatch this time, as I'd just finished the Tubey Sweater which made use of the same needle size and stitch as this pattern. Given the size of that thing, that might have been a mistake :-) Note, the size on this is just fine.
- It's a very little sweater. Like the smallest iteration of a shrug you'll find. More like a fitted scarf with armholes. But for all that, I imagine it will have a place in my wardrobe.
Thursday, October 13, 2011
You Said You Wanted Pictures...
Tubey Sweater - modified in many ways...
So, here you have it - a sweater I am proud to say I made my own, even if I don't think it works on me. Fortunately, some friend of mine is about to receive it as a love gift.
How I Modified It:
So, what do you think??
How I Modified It:
- Altered sleeve length and shape - from long bell to 3/4 straight.
- Added garter stitch at sleeves (cuz I hate stockinette roll)
- Added garter stitch - using smaller needle size - at ridiculously low cut neckline
- Was the cause of the ridiculously low cut neckline by lowering it 3/4 inch.
- Made smaller the back size - this is like a slightly smaller XS...
- Shortened the bottom to suit my proportions.
- I think the sleeves were a real success.
- I love the yarn - which was tricky to work with, but lovely to touch and wear.
- I knitted this competently, I feel, finding work arounds to problems - developing confidence in pattern modification and knitting ability.
- The neck is just wrong for me. Even if I hadn't lowered it, it wouldn't have been right. Without the garter rib, it was a floppy mess - and that wasn't my fault. My tension was even and I worked hard to keep it tight (given that I'm a relaxed knitter). BTW, Scott laughs at the thought that I'm relaxed at anything...
- The ribbing is just too stretchy. It doesn't suck anything in, leaving my abdomen at an aesthetic disadvantage.
- I don't like the length. This would be easily enough fixed by adding garter to the bottom but that won't fit the stretchy rib issue. I've learned I probably don't want to do ribbing - unless it's in a very small needle size and, who are we kidding, that would be a nightmare to complete!
So, what do you think??
Tuesday, October 11, 2011
Shout Out to the (Knitting) Experts: Wet Blocking a Complete Sweater
So, I just this second finished the Tubey sweater. I have lots of thoughts and feelings about it (and photos to come) - amongst them:
- Wow, this thing is really low cut - especially since I lowered the neckline by 3/4". Note: Based on measurements, I believed the neckline was going to be very high, if constructed as per the instructions. (My measurements were, apparently, erroneous.) Happily, I came up with a great work around - again - details to follow next post...; and
- I don't know if I like it, but I sure don't hate it and, while knitting, I learned SO many things. Even if I never wear the thing - and with a cami I will wear it - it's been more than worth the experience.
Monday, October 10, 2011
This is Pants
This post is a rant.
It doesn't come with photos. It's not happy. It likely will not predispose you to take up sewing.
Nonetheless, when you have the kind of creative day that pushes up challenge after challenge - who are we kidding, they're legitimate problems once you have 10 of them, and each is predicated on the last - putting on a sweet face isn't really authentic.
I finished the Clover trousers and, right now, I'm not loving them. For a simple pair of pants (fitting was more or less done with this muslin), they sure did take me fucking forever. Like 16 hours.
Let's outline the issues:
Sarai, in one of her posts, advises participants not to overfit. I think that's really smart advice. The pants don't need it. (Quite honestly, I think that an overfitted garment is as bad as one that hasn't been adjusted at all. And the danger of making a muslin or two, much like that of using Botox, is that sometimes we don't know when to stop.)
The other reason for trying again is that, despite everything, I have a really gorgeous finished product. The pants are totally flattering. If not slimming, and I suspect they are, they totally make the most of one's assets with their streamlined design.
Over and out.
It doesn't come with photos. It's not happy. It likely will not predispose you to take up sewing.
Nonetheless, when you have the kind of creative day that pushes up challenge after challenge - who are we kidding, they're legitimate problems once you have 10 of them, and each is predicated on the last - putting on a sweet face isn't really authentic.
I finished the Clover trousers and, right now, I'm not loving them. For a simple pair of pants (fitting was more or less done with this muslin), they sure did take me fucking forever. Like 16 hours.
Let's outline the issues:
- I either read the pockets instructions wrong (I can't bear to look at that pattern again for a while, so I can't confirm it right now), or they're unusually inserted, leaving an (interior facing) exposed raw edge. I managed to finish and invert them to get a clean finish, but only after having to chop half of them off. (Note: I don't need the pockets so it's not a fitting problem. In fact, I don't like front facing pockets right at my stomach, even if they are discreet, so I'm likely never going to make them in these pants again.) Furthermore, don't use Bemberg lining. It frays like a bitch and the fibres stick to everything. That pissed me off all day.
- I like inserting invisible zippers. Well, I like inserting them better than any other kind of closures, which means they're tolerable. But side zippers are much more finicky, apparently (this being my first ever) than back zippers. The hip curve makes them tricky to align, not to mention that they take wear differently. Given that I had to be utterly certain to get the sides to line up, it took a LONG time. 90 minutes later, I had a lovely finished product that proceeded to fall apart (at the part where the waistband unit meets the pants top) as I pulled it up. The zipper is sticky there, given the fabric bulk and join. Mercifully, the follow up zipper only took 20 minutes to insert. As I'd serged the outer seam leg of the pants (remember my last experience of that?), I had no room for error. I just decided to stop over-thinking and it went in pretty well. Also, I used tape to hold the zipper down. Why don't I do that all the time?? Basting an invisible zipper is ridiculous.
- I forgot to serge the ankle hems before assembly. I don't think the pattern instructs it, and I followed the pattern exactly, to the best of my ability, which meant I had a miserable time trying to do it once everything was put together. It's pretty nasty looking.
- But the piece de resistance of stupidity was when I inserted the zip on the left side (the opposite of the one stipulated in the pattern). That meant I had to invert all the instructions and rip apart already finished (according to pattern instructions) waist facing and waistband units. Note to self: Don't finish things till you've checked to see if you've mixed up left and right (a semi-regular occurrence). I was lulled into a false sense of security because the instructions are so clear and well presented. I know, I'm blaming clear instructions for my errors. How rude is that?
- I don't like facing. There, I've said it. If you're even vaguely off, the facing unit and the waistband unit don't align perfectly at the already inserted zip, which makes the finishing process very challenging.
- Furthermore, I think the waist finishing - while really clever and, I'm sure, beautiful if you are working with an amenable fabric, machine and a comfort level with zipper feet / aren't sewing (somewhat blind) and dangerously close to zippers that have already fucked up once - is difficult to pull off. I know the next time I try this pattern - and there will be a next time after the sew along ends (once I've had some time and a chance to see how Sarai tackles the waistband) - it will be easier as I will have seen everything twice before.
- This pattern is very well conceived, explained, and is not conceptually difficult. It does take rather a lot of dexterity for a beginner pattern. But pls., peeps. I'm dextrous and I'm not a beginner!
Sarai, in one of her posts, advises participants not to overfit. I think that's really smart advice. The pants don't need it. (Quite honestly, I think that an overfitted garment is as bad as one that hasn't been adjusted at all. And the danger of making a muslin or two, much like that of using Botox, is that sometimes we don't know when to stop.)
The other reason for trying again is that, despite everything, I have a really gorgeous finished product. The pants are totally flattering. If not slimming, and I suspect they are, they totally make the most of one's assets with their streamlined design.
Over and out.
Sunday, October 9, 2011
Thanksgiving
Saturday, October 8, 2011
By the Book
I'm having 9 guests for Thanksgiving dinner tonight. Scott's in charge of the capon. I'm the baker. (We don't like to mess with the holiday cooking stereotypes, as you can see...)
Yesterday I made a streusel coffee cake (the second in a week), from my stand-by recipe - which is as beautiful to look at as to eat. Vis a vis the ongoing recalibration, I do feel compelled to tell you, in brief, that I ate but one small piece of the first cake (do you know, it's a sin not to eat beautiful baked goods you make yourself?) and I intend to eat whatever I like today. It is Thanksgiving, after all.
This morning, I finally tried my hand at the flan boulanger I have referred to on a few occasions. I will serve it with a simple raspberry garnish.
The recipe is one of Michel Roux's, from Pastry: Savory and Sweet, a book which I cannot recommend enough. Whether you are a novice or a seasoned baker, this book clearly articulates the steps in making perfect pastry and it does so in lovely, spare French-style. As I've mentioned many times, the keys to making pastry are the right ingredients, the right equipment and the right frame of mind. There is no mystery - but there is alchemy.
The custard is made from a lightly boiled vanilla bean milk mixture added to a thickening mixture, which includes eggs... This one (and the purist snob in me is slightly huffy) makes use of flour and a tbsp of custard powder (essentially corn starch, sugar and colouring). I'm amazed a fancy French chef condones the use of powder, nay, instructs it! Hey, if it works...
And here's the finished product!
I didn't have a lot of time to let the dough rest, unfortunately, as I'm sharing the oven today. As a result, it shrank more than I'd like and looks a bit crass - despite a secondary rest period in the fridge, after rolling but before baking. I expected that; resting allows protein chains to relax, which mitigates shrinkage, and can have potential implications on the finished texture. To work around, I left extra overage at the top of the tart pan - that in addition to the overage caused by pinching the dough. You can see, it really needed it. As it is, the crust-edge is wildly uneven. Not that it's going to matter when it's beautifully plated. And if it tastes awesome, I'll feel alright.
Yesterday I made a streusel coffee cake (the second in a week), from my stand-by recipe - which is as beautiful to look at as to eat. Vis a vis the ongoing recalibration, I do feel compelled to tell you, in brief, that I ate but one small piece of the first cake (do you know, it's a sin not to eat beautiful baked goods you make yourself?) and I intend to eat whatever I like today. It is Thanksgiving, after all.
This morning, I finally tried my hand at the flan boulanger I have referred to on a few occasions. I will serve it with a simple raspberry garnish.
The recipe is one of Michel Roux's, from Pastry: Savory and Sweet, a book which I cannot recommend enough. Whether you are a novice or a seasoned baker, this book clearly articulates the steps in making perfect pastry and it does so in lovely, spare French-style. As I've mentioned many times, the keys to making pastry are the right ingredients, the right equipment and the right frame of mind. There is no mystery - but there is alchemy.
The custard is made from a lightly boiled vanilla bean milk mixture added to a thickening mixture, which includes eggs... This one (and the purist snob in me is slightly huffy) makes use of flour and a tbsp of custard powder (essentially corn starch, sugar and colouring). I'm amazed a fancy French chef condones the use of powder, nay, instructs it! Hey, if it works...
This is the parbaked crust. You can see the initial shrinkage (see below for explanation). The reason you prick the base is to encourage even cooking. It allows steam to escape without puffing up the pastry. That, in addition to blind baking with parchment atop of which you place weight (rice, beans, stones etc.) will ensure a level end result.
And here's the finished product!
I didn't have a lot of time to let the dough rest, unfortunately, as I'm sharing the oven today. As a result, it shrank more than I'd like and looks a bit crass - despite a secondary rest period in the fridge, after rolling but before baking. I expected that; resting allows protein chains to relax, which mitigates shrinkage, and can have potential implications on the finished texture. To work around, I left extra overage at the top of the tart pan - that in addition to the overage caused by pinching the dough. You can see, it really needed it. As it is, the crust-edge is wildly uneven. Not that it's going to matter when it's beautifully plated. And if it tastes awesome, I'll feel alright.
Friday, October 7, 2011
Spell it Out
In a strange turn of confluence, I read Sunni's post, inquiring about the importance of customer service on the very same day I was following up with Amy Karol (renaissance woman and Etsy proprietor) about the whereabouts of my latest web-purchase love-on: Balancing Facial Oil.
Whoa, there's a lot going on in that first paragraph...
Here's the backstory:
So I ordered the oil, and anxiously awaited its arrival.
Three weeks later I was still waiting. (Canada Post really boggles the mind...) When I emailed Amy to follow up, I got the promptest - politest - reply a) apologizing for the delay and b) indicating that she'd send a replacement the same day. That's some awesome client service - and it further inclined me (pending product quality) to purchase a potion for all my peeps this Xmas. To extend the good will, I suggested that we wait a couple more days to see if the parcel would miraculously appear. Stranger things have happened here. And, lo, 2 days later - it arrived!
Upshot: The product is potion-y goodness. Smells terrific. Feels awesome. Helps the planet. (I'm kind of making that one up, but go with it.) Perfect Xmas size, shape and function. Woohoo!
The thing I love most about it though - and this says so much about me, I realize - is that it is incanted with an actual spell to enhance my beauty as I use it!? This potion is actually a potion!!! Only on Etsy, people...
Let me urge you to purchase one of Amy's facial oils for yourself (it's a very reasonably priced indulgence that feels/smells great and it's not full of hideous chemicals) and/or consider buying these for your friends and family over the hols. No one is paying me to say this. I'm compelled by good product and good service.
Whoa, there's a lot going on in that first paragraph...
Here's the backstory:
- I love potions (as you probably know).
- I love supporting small business.
- I love Etsy.
- I love organic stuff.
- I love anything scented with rose and ylang ylang.
- I love Amy Karol's blog.
So I ordered the oil, and anxiously awaited its arrival.
Three weeks later I was still waiting. (Canada Post really boggles the mind...) When I emailed Amy to follow up, I got the promptest - politest - reply a) apologizing for the delay and b) indicating that she'd send a replacement the same day. That's some awesome client service - and it further inclined me (pending product quality) to purchase a potion for all my peeps this Xmas. To extend the good will, I suggested that we wait a couple more days to see if the parcel would miraculously appear. Stranger things have happened here. And, lo, 2 days later - it arrived!
Upshot: The product is potion-y goodness. Smells terrific. Feels awesome. Helps the planet. (I'm kind of making that one up, but go with it.) Perfect Xmas size, shape and function. Woohoo!
The thing I love most about it though - and this says so much about me, I realize - is that it is incanted with an actual spell to enhance my beauty as I use it!? This potion is actually a potion!!! Only on Etsy, people...
Let me urge you to purchase one of Amy's facial oils for yourself (it's a very reasonably priced indulgence that feels/smells great and it's not full of hideous chemicals) and/or consider buying these for your friends and family over the hols. No one is paying me to say this. I'm compelled by good product and good service.
Labels:
Angry Chicken,
Balancing Facial Oil,
Etsy Boutique,
Potions
Monday, October 3, 2011
Two Yards Down
Photo of Colette Patterns Clover Pants
I spent Saturday constructing my first muslin of the Colette Clover pants. Here's what I can tell you so far:
- It's a gorgeous pattern to sew. Never mind the finished product, which I haven't yet completed, very few patterns have the confluence of flow, excellent instruction and intelligent construction that this one does. I cannot wait to give it another go. Seriously, how often do you hear me wax rhapsodic about fun construction?
- My zenness stood me in good stead as I managed to produce a first garment that is SO not wearable - and for the most unexpected reason: Shortening the crotch depth by an inch transformed it from what (I presume) would be low/mid-rise to practically pubic. I've never encountered this problem before - I suppose there's a first time for everything.
- This is sad, if only from the standpoint of the fabric I have sacrificed. You may be thinking: Well, Kristin, you knew what you were getting yourself into. Why did you use fabric you'd be sad to see wrecked? The answer: I'm eternally hopeful and wanted the potential of a great end product - which it may well have been (other adjustments notwithstanding) if I hadn't created the most non-negotiable of issues - inadequate amount of fabric to cover all the areas. Seriously, what a great blog post - and real-life story - that would have made. Furthermore, I didn't remember - till after I cut and started sewing - what awesome hand that worsted had. I like to think I'm a (torched) yard and a half closer to expertise. Isn't always painful to sacrifice fabric on some level?
Sunday, October 2, 2011
Pool of the Week and Question
Photo from Desire to Inspire - which never reblogs (or does so skillfully enough that we don't notice it)...
I just read an interesting interview on DisneyRollerGirl about, among other things, "rebloggers". According to Cathy Horyn, the majority* of us simply rehash the work of others in a most un-journalist(ic) fashion.Lord knows, that occurs to me every time I find a pool porn photo and feel compelled to post it. I mean, I've only ever taken my own pic of one of these pools. I live in Canada, after all. Also, fancy photographers, with access to richie people abodes, tend to do these pics more justice. Come to think of it, journalists aren't the ones taking the fancy photos in a high percentage of the meaningful, probing and original articles they write (especially the ones they write about rich people pools).
But what do you think? Does the shot above call attention to the cut and paste quality of which Ms. Horyn accuses us? Are we bloggers trying to be journalists? Comedians? Diarists? Teachers? Scientists? Anarchists?
Personally, I'm a little of column A and a little of column B. (Hahahaha, get it?) Last time I checked, no one was paying me to be investigative, so I'm not going to worry too much.
*On a total tangent, I really struggle with collective nouns, btw...
Saturday, October 1, 2011
On Today's Agenda and Deep Thoughts
Just thought I'd offer up a few (fascinating) bits of info before disappearing into the sewing lair...
The TNT sew is a lovely way to make a new item in your wardrobe that (all sewing acts of God aside) will be a relatively sure success.
Muslin-making is applied engineering. It's the time and space you are privileged to share with a designer's schematic, learning how to turn his or her vision into a beautifully fitting garment on your own body. The process is not designed to provide you with a relatively quick, finished item. It's designed to challenge all of your perceptions of three-dimensional space and your own body. It's a chance to learn more about your shape and your craft. What you gain is so much more than a finished object. So, let's all try to be here now. And, yes, by us, I do mean me.
Stay tuned...
- The Tubey sweater is coming along. Wow, I'm learning a lot about technique on this project. And my LYS, Lettuce Knit, has been an invaluable teaching resource. I unreservedly recommend this place. The quality of product is high, the client service unparalleled, the staff passionate and helpful, the community rich. (I do think the website could be jazzed up a bit, but that's quibbling.)
- Mardel, in a comment on my last post, finally contextualized the fit dilemma of the shrug (as it appears in this garment and the Wispy sweater). As it's knitted straight (from wrist to wrist), there is no shaping at the armscye - so those wingy, pouchy bits at the back arm where it meets the side back are more or less inevitable. Your only recourse is to make the fit so perfect (snug), that they don't pop out.
- I have most definitely done this. The finished shrug is about as snug as it can be without being too snug.
- I loathe the edge roll of stockinette. If I'd realized this fully, I would have garter stitched around the shrug's top (front side and neck) edge. Of course, my circuits have been on full drive with this project, so adding another alteration might have been overwhelming.
- Debbie Bliss Rialto aran yarn, while very luscious in its knitted form, is a bitch to work with. The microfibre seems to make all the strands puffball out and splitting is a regular occurrence.
- I've just started the ribbing part of the body. FYI, in consultation with my knitting experts, I decided to make the XS for the entire sweater. Even though the term "XS" seems at odds with me in the chest area, I was reminded to disregard that and remember that the ribbing in XS is going to stretch to 40" at the bust. Given that I've knit the shrug at a smaller size than the XS, the ribbing at S was going to add a lot of stitches onto this thing. Too many, I finally concluded. My gauge swatch (not an accurate rep, I've come to realize, as my tension is tied to my feelings in any given session) showed that I was knitting the rib slightly loosely (though not visibly so). If this continues when I knit in the round (and it may not), it's best to have the smaller size - cuz I'm already building in a bit more ease.
- I couldn't manage to pick up 90 stitches stringently according to 4/5 or 7/10 ratios - that's really hard to keep track of. So I just did my own thing (aka, leaving space every now and again) and, cross fingers, it seems to have worked.
- I'm about to make a muslin of the Clover pants - I realize I'm not waiting for the sew along, but I reserve the right to stop at any time.
- I'm using a remnant of worsted, which I used to make a skirt I wear regularly. It's the perfect amount of fabric, and if it works well, I'll have a full-size, wearable muslin.
- If it doesn't produce something wearable, the fabric will have met an honourable end. Either way, it will have helped me to perfect the fit of this garment on my body.
The TNT sew is a lovely way to make a new item in your wardrobe that (all sewing acts of God aside) will be a relatively sure success.
Muslin-making is applied engineering. It's the time and space you are privileged to share with a designer's schematic, learning how to turn his or her vision into a beautifully fitting garment on your own body. The process is not designed to provide you with a relatively quick, finished item. It's designed to challenge all of your perceptions of three-dimensional space and your own body. It's a chance to learn more about your shape and your craft. What you gain is so much more than a finished object. So, let's all try to be here now. And, yes, by us, I do mean me.
Stay tuned...
Subscribe to:
Posts (Atom)